Getting Started
MilesforTax is an automated Mileage recorder, accumulator and log for your smart phone. It primary purpose is to automatically
record your mileage and store the mileage for Tax and other reporting purposes if you use you vehicle for business or charity
or if you just need an log of you travel.
You can read this quick start/guide any time without necessarily running MilesforTax.
The tutorial helps you with the one-time set up of MilesforTax on your smart phone. After the setup MilesforTax works in the background on
your smart phone to record your mileage whenever you are in your vehicle.
Download, Install and Setup
1) Download MilesforTax from Google play. It can be found searching for "MilesforTax" in the Google play search.
MilesforTax is one word.
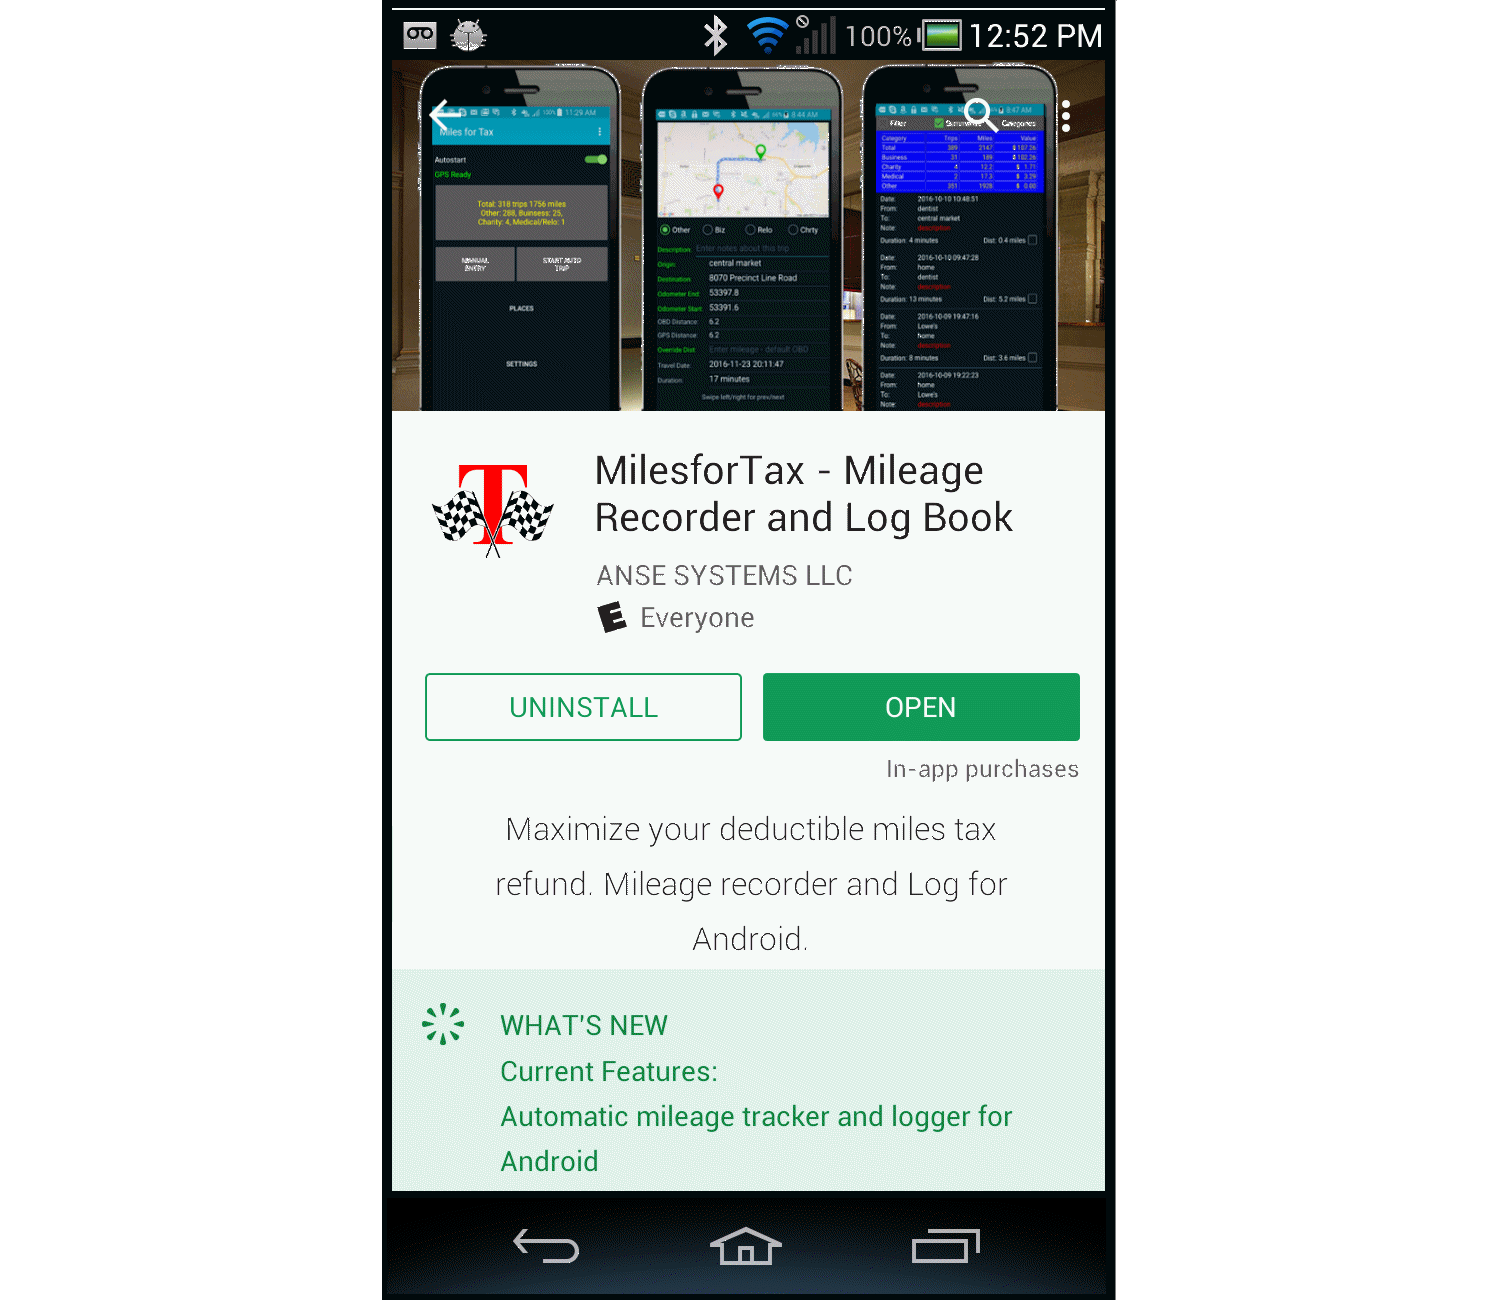
2) Select install - press the install button.
3) Run MilesforTax for the first time by opening the app - press the Open (on the play store page).
You should see a screen like the one below to login.
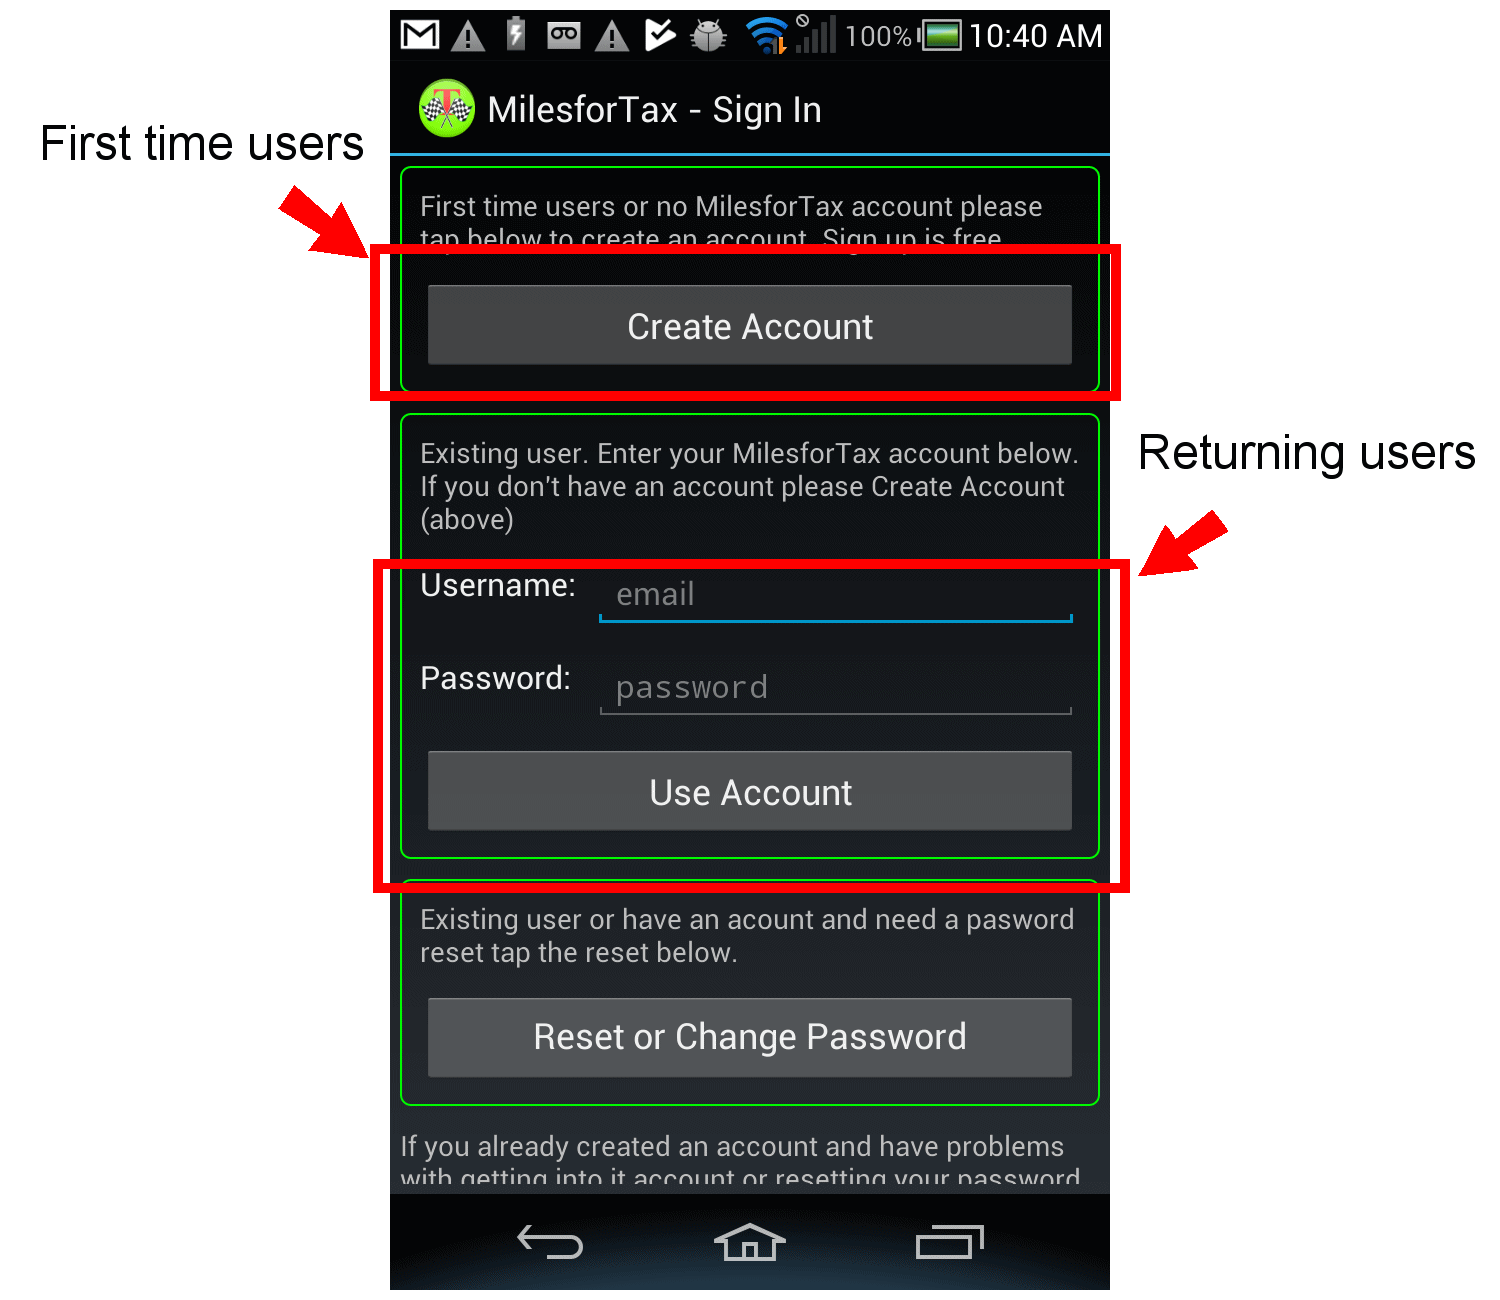
4) If you are a first time user press "Create Account" and on the screen that follows enter either your email or text number and your first
name and last name. Please use the names that are to appear on an expense report. MilesforTax will send a validation code to the email or Text
number you supplied. Enter the validation code, the continue button will be enabled and can and press continue.
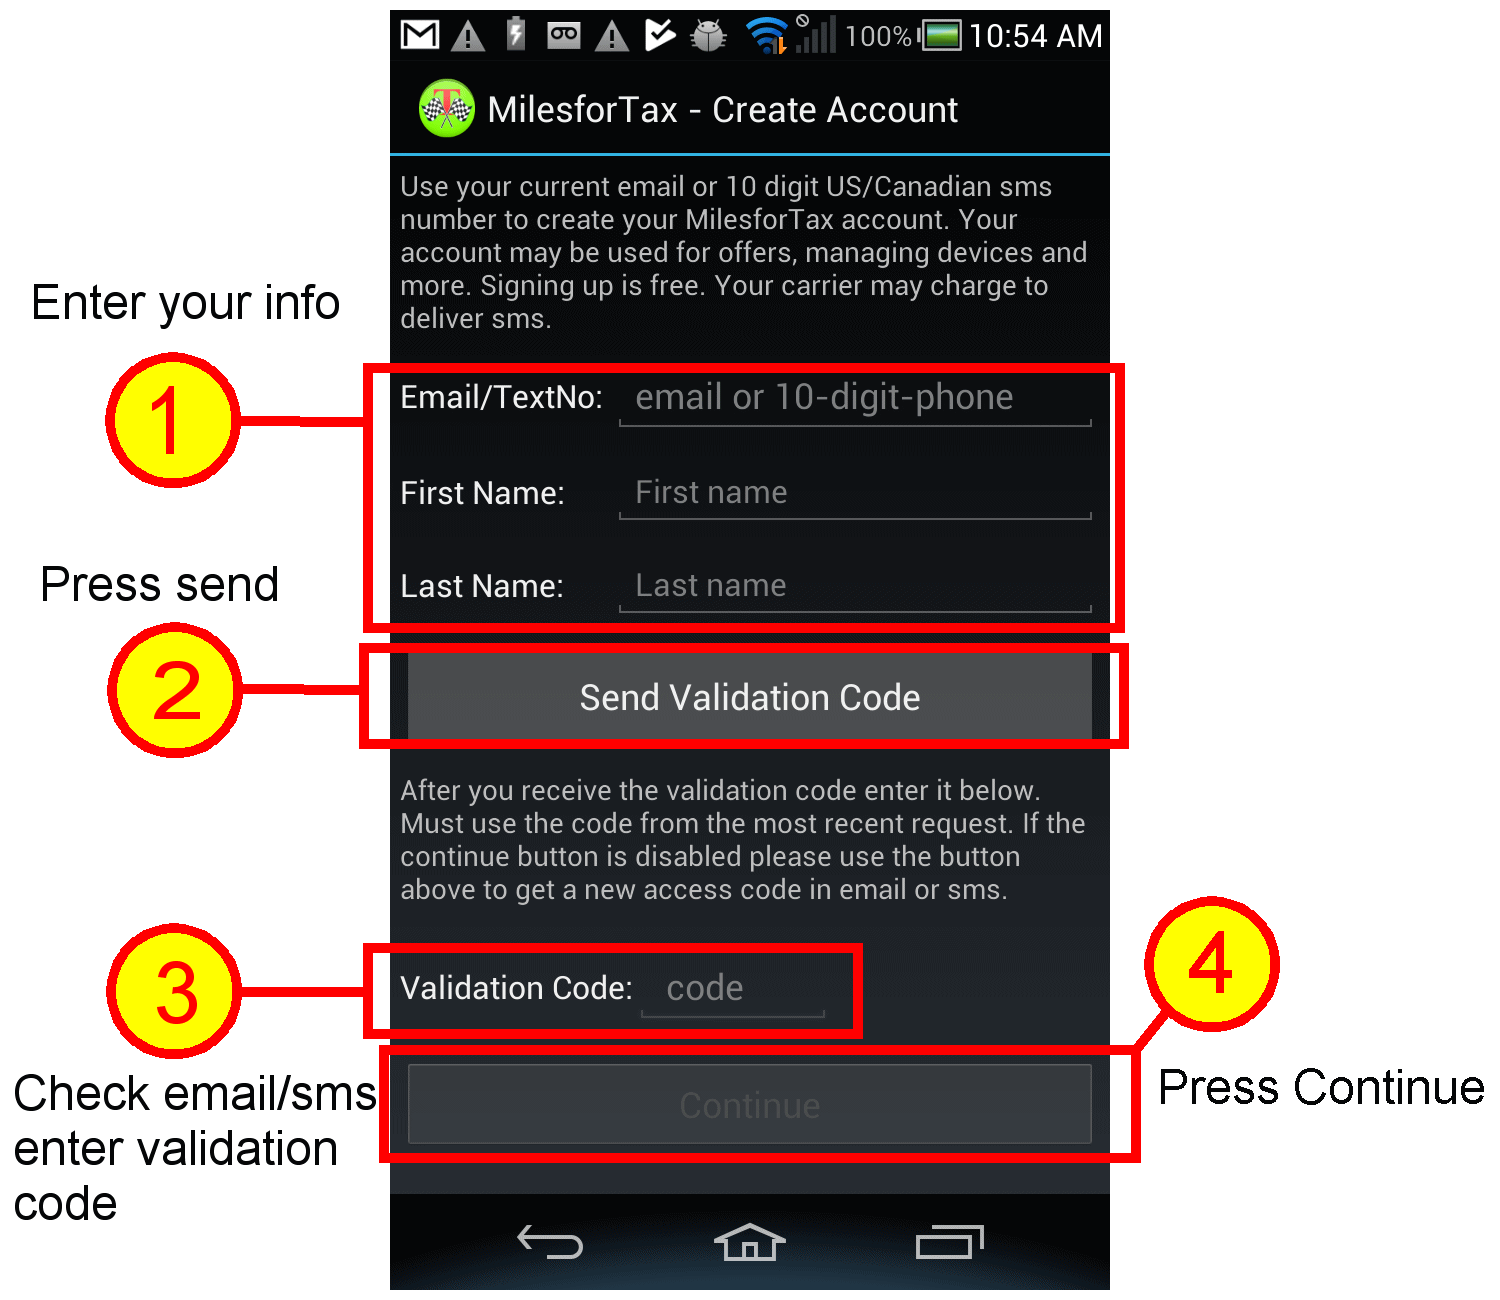
5) After you press continue you can enter your new password and a customer pin. The pin an any 4-8 digit number you can enter.
it helps customer service authenticate without asking for your password.
6) If you already have a MilesforTax username and password enter them and press use account. The passwords are validated and stored
so when MilesforTax needs to create a session with the server it will use this account and password. Emails/username is not case sensitive however
password is case sensitive. If you forget your password use the Forgot password to reset a password. A validation code will be sent to
the email and you can use this to reset the password.
7) Grant permissions (Android 6, 7 and on) - Location and SD Card access.
8) Once permissions are granted the APP is running all you have to do is drive in your vehicle.
For most users this is all that is needed to do to get set up and running.
The defaults after install will allow MilesforTax to run once a vehicle speed is detected.
The initial settings after install will use the speed trigger to start recording your mileage in the background
as long as the Automated start switch is on.
Running MilesforTax
Once you have installed and set up MilesforTax it will continue to run like your alarm clock on your phone, using very little power
and resources as long as the
Automated Start switch see below is in the on position similar to turning the alarm "on" on an alarm clock.
MilesforTax can be left running continuously in the background until it need to read a sensor or measure your distances
or you interact with it. To get the best benefit from using MilesforTax, let it run in the background. If you have
concerns about how much power it uses check the battery usage monitor on your smart phone.
When you get in your vehicle MilesforTax will use available sensors on your smart phone to detect your movement, your vehicle or
the movement of your vehicle or paired electronics in your vehicle and automatically use the information to start your drive.
MilesforTax is automated so there is really not much to do to make it run and collect your mileage once it is set up.
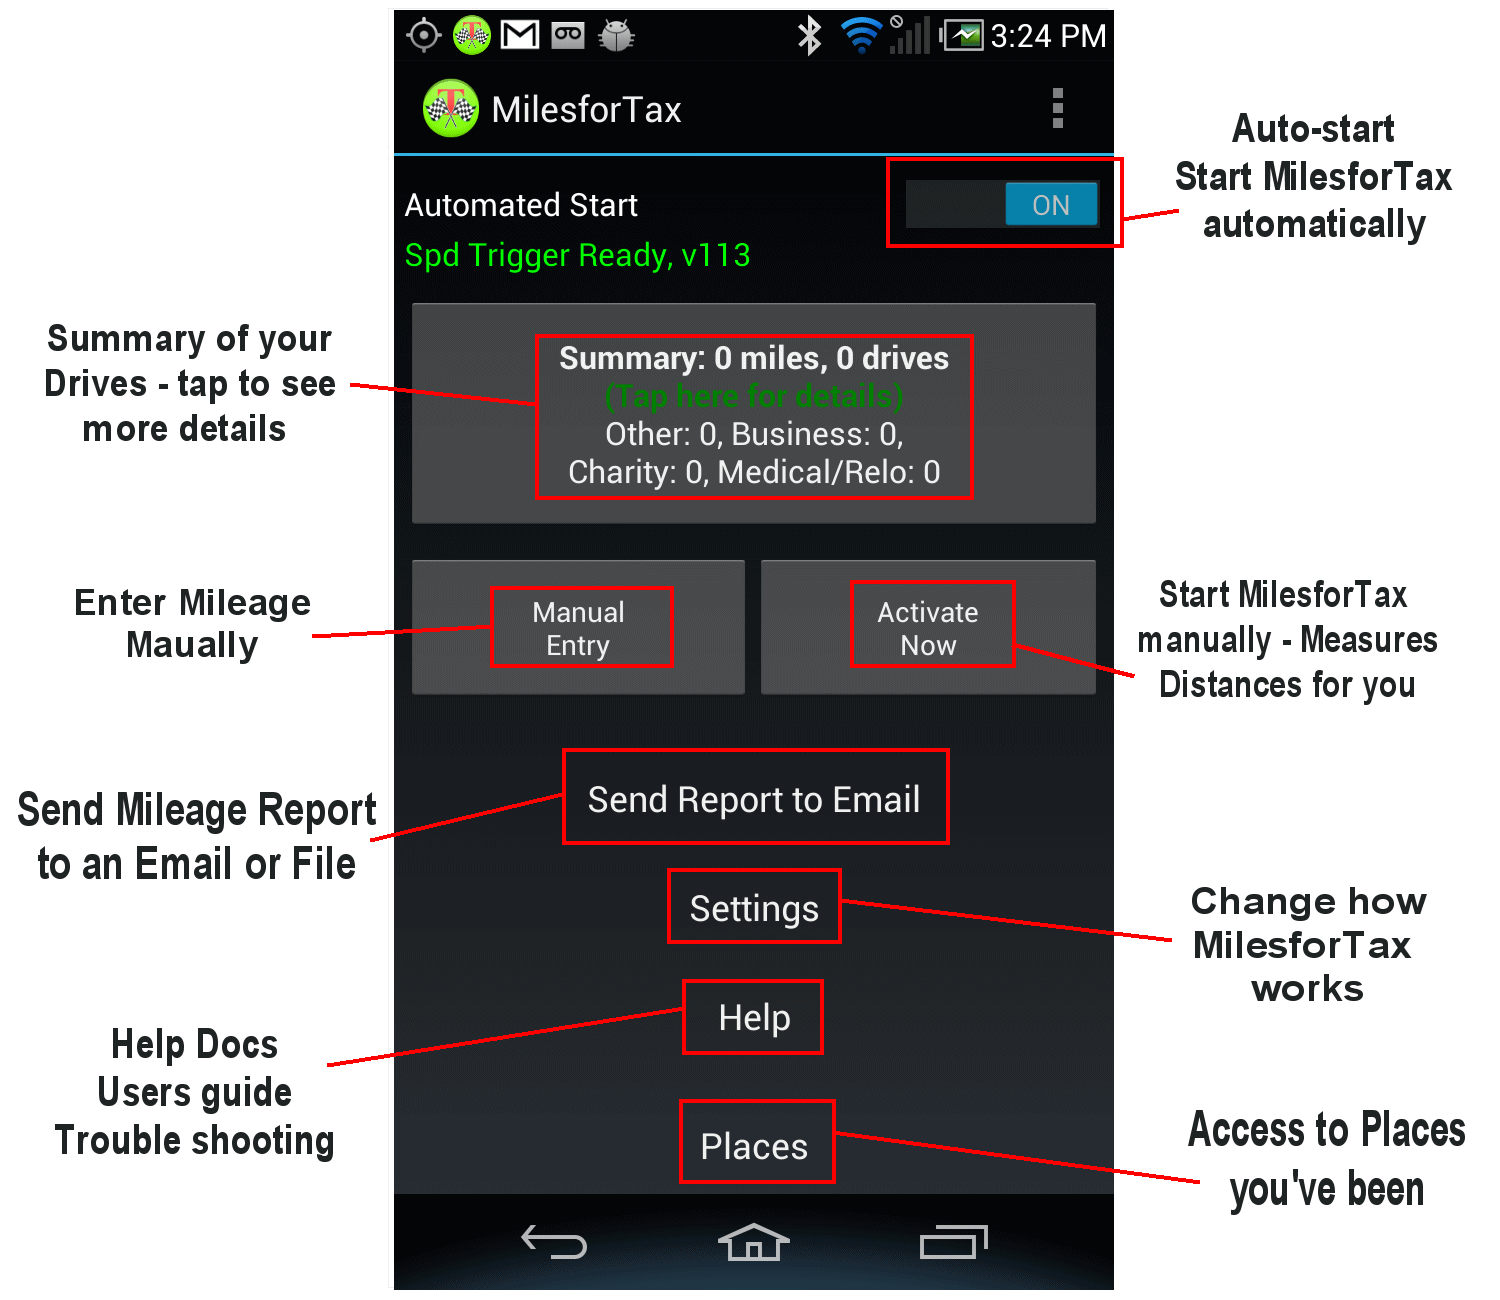
You can also start the drive manually if you need to: Press the "Manual Start" see below. On the screen that appears
select start button with Gps. Or if you have
an OBD-II device you can select the OBD-II manual start.
1) After your drive is concluded your mileage will be added to the mileage in the summary mileage on the main screen.
New drives default to Category other. You can tap the summary button to see the details and edit your miles and
change the category.
2) You can also tap any of the other buttons (settings, manual entry, activate now, places, send report to email) or the menu to gain
access to other screens
3) Questions about permissions - see
Permissions
The app is starts running once you start it the first time and will continue to run like an alarm clock until you stop it. After the initial
install and login you will see a screen like the one above.
The screen will be empty (0 miles recorded) if this is the first time you have used MilesforTax.
If there is mileage recorded from a previous version or if you enter miles manually there will be data on that screen. Assuming you
use a GPS enabled smart phone and the GPS is enable (and the Autostart switch is enabled) when you get into a vehicle that goes faster
than 8 mph... MilesforTax will start recording you mileage.
When your phone stops moving or disconnect from a trigger there is a count down timer that starts a 2-minute or 15-minute count down.
When the timer runs out MilesforTax will keep the mileage measured up to that point and display it on the summary screen.
The timer is cancelled if you start moving again before the timer runs out or the sensor is re-engaged.
The timer is ended and the state of your drive recorded if you press and hold stop. If your phone shuts down or the application is terminated
the mileage records up to that point is what is stored in the MilesforTax log.
MilesforTax has some error discriminators that are
used with the sensors that are tuned and limited to the range of speed and acceleration for normal (and high-performance) automobile.
Automated Start
The
Automated Start switch sets up MilesforTax for real time mileage recording that it is completely automatic and hands free.
The switch is located on the main screen where it will be easily accessible to turn off or on.
The
Automated Start switch see above is in the on position similar to turning the alarm "on" on an alarm clock.
When this switch if off MilesforTax is not linked to any sensors and will not start recording unless you manually start it.
Any drives that occur when this feature is off are NOT recorded.
Drives that start when the switch was already on will be recorded as the switch starts MilesforTax when the drive start is detected.
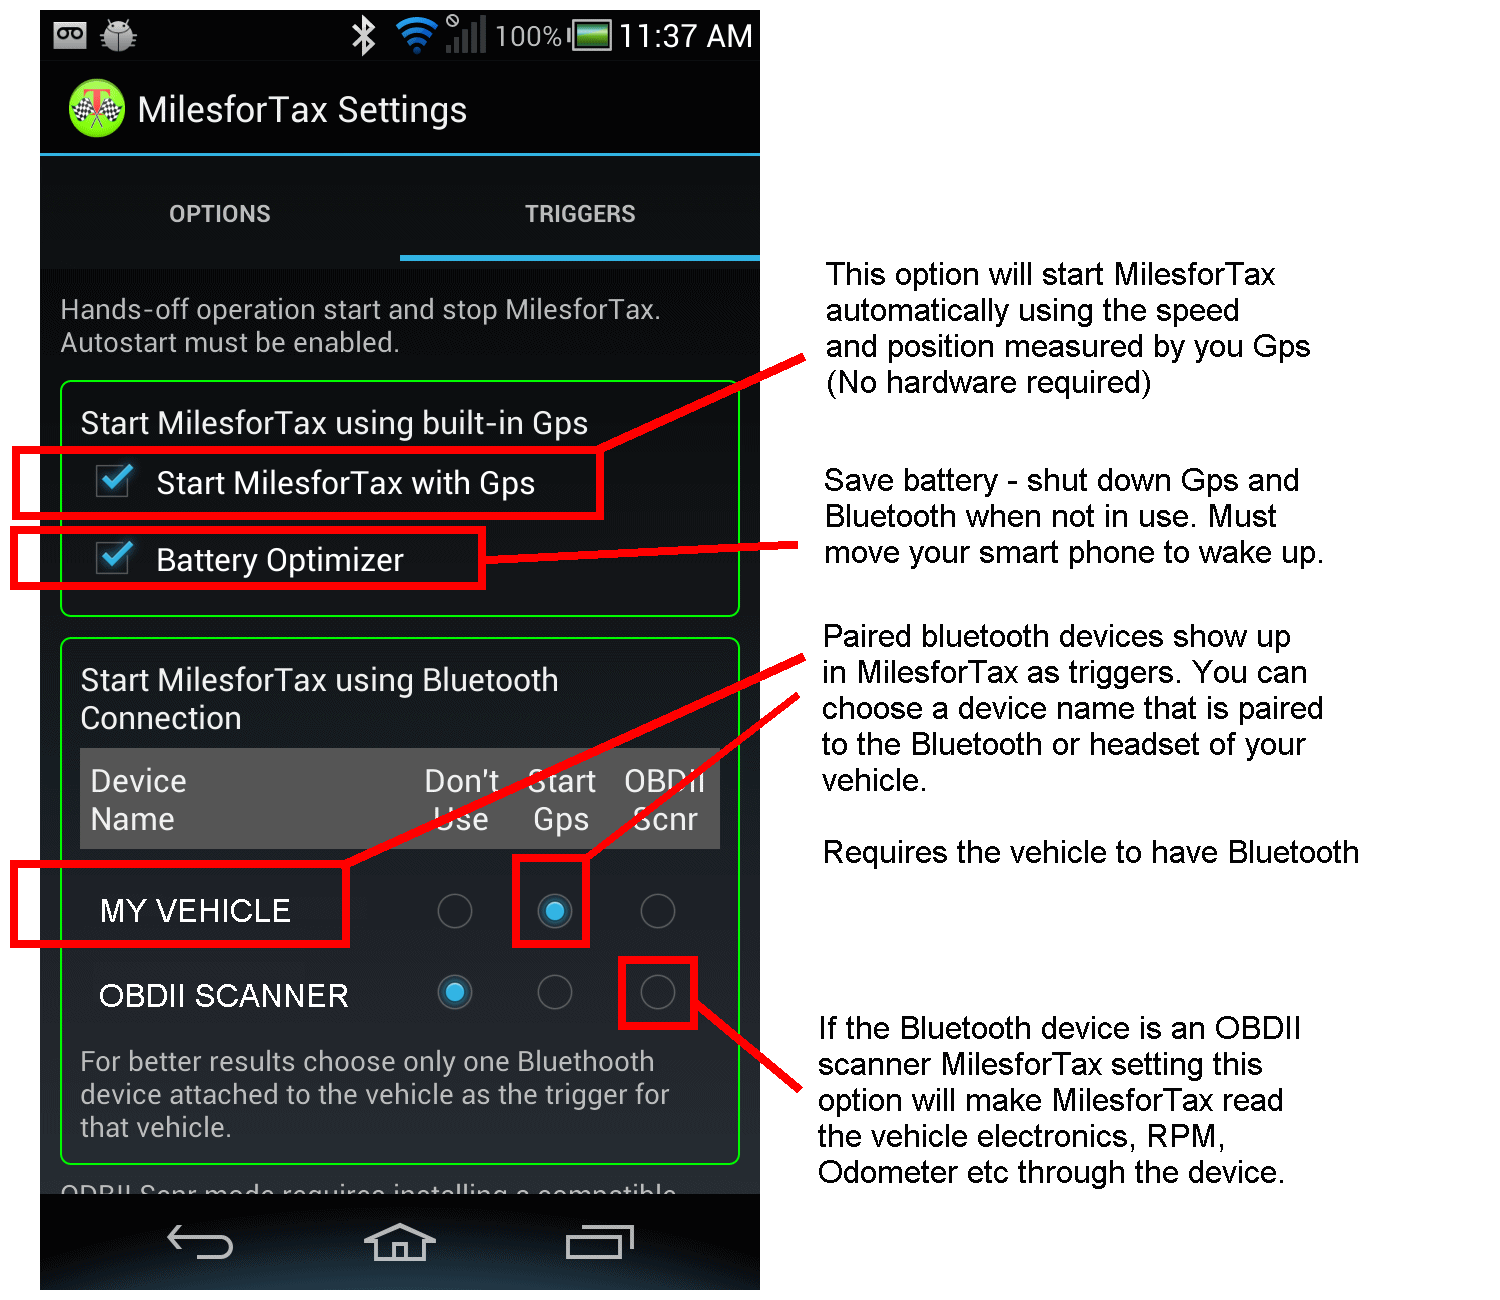
Automated start uses multiple sensors: accelerometers, magnetic fields, bluetooth, Gps position, speed, time, as well as
being able to detect and read paired vehicle electronics, or through the emissions control module (ECM). Real time mileage
is measured from the Gps in the phone or from the internal Odometer in the ECM. Click
here
for more information about installing and using the OBD-II scanner.
You can configure several devices to start MilesforTax. The first configured bluetooth device detected is used as the primary
trigger. If no bluetooth devices are detected MilesforTax uses short history to determine actual starts based on speed.
Automated Stops
Automated stops happens on drives that were started with the automated start feature and are not currently paused or ended.
The automated drive will end if it was started by detecting a vehicle electronics that indicated the vehicle was turned off
of moving out of range of detection range of the device used for the automated start. If a drive is to be automatically ended
a timer is used to finalize the drive and record it. The timer has two settings - 2 minutes and 15 minutes.
The default at installation is 15 minutes. If the same device used to trigger the initial drive resumes before the timer runs
out the drive will be continued. A different device cannot be used to continue the same drive, but as soon as the current
drive is ended a different device can be used (devices are selected by preferences). Drive will stop if you press and hold
the stop drive button. The maximum duration of a continuous drive is 36 hours.
Settings
Application settings help you customize the behavior of MilesforTax. Most settings on the general options are self explanatory.
Be thoughtful about not selecting the "Start MilesforTax on Reboot". If your phone restarted or runs out of battery and is later charged
and being used MilesforTax will NOT be running it the background and will NOT record your mileage.
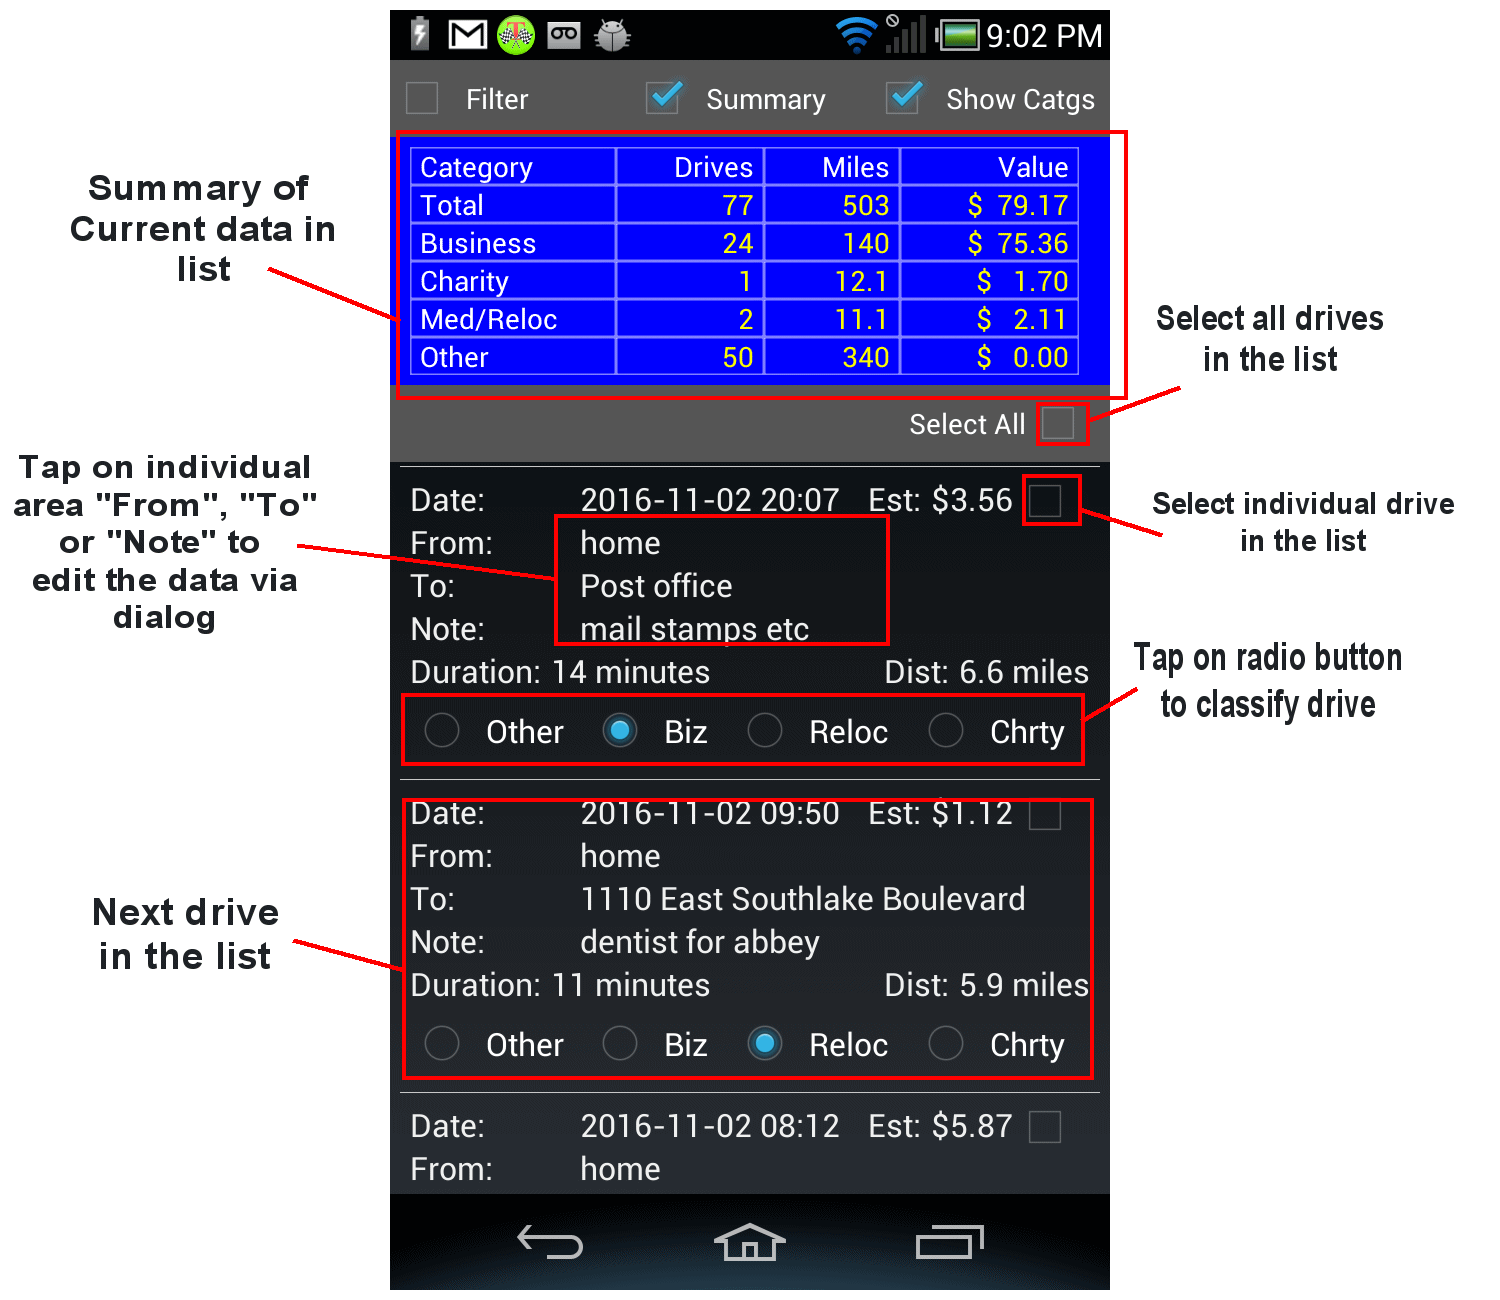
Drive Categorization
You don't have to categorize your drive right away you can do it when you have time at the end of the day, week or month etc. Categorizing
your drives are done by tapping on the summary to get to the detail drive page and selecting the radio button to categorize the drive. There
are four categories to choose from. Biz, Charity, Medical/Relo and Other. The Other category corresponds the non-rebate category "Personal
miles". MilesforTax doesn't try to categorize your drives.
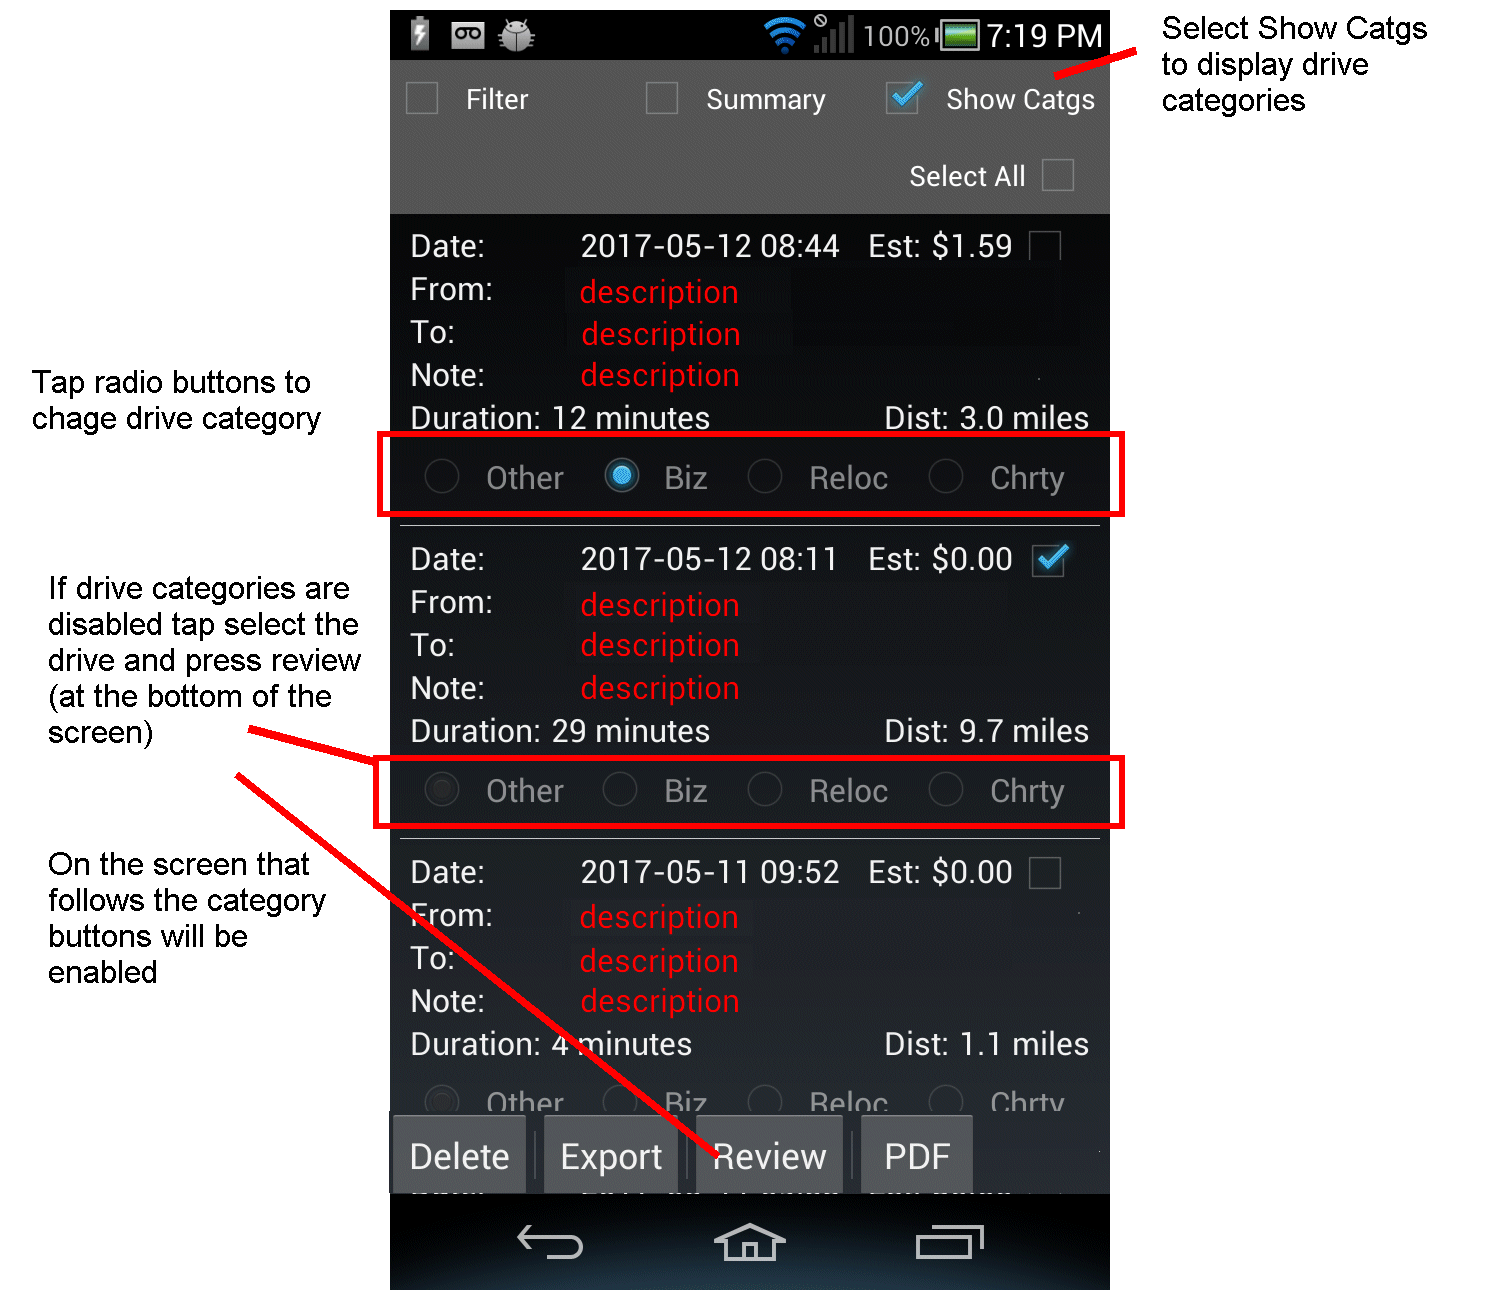
To categorize your mileage tap the drive categorization radio button on the drive. The drive is categorized based on the radio button.
If the drive is not showing the buttons on the drive listing screen you can select the
Show Catgs check box. If after the
category buttons show they appear read-only tap the drive and on the next screen that comes up you should be able to change the drive
category. The read-only buttons feature is controlled in the settings to prevent accidental changing of categories on older drives.
Drive Listing
The primary function of this screen is to help you classify your drives. To get the drive list view from the main page above tap on the button
that says "tap here for details". It you have mileage recorded you will see a screen like the one below. On the drive list view you can see a
listing of your drives, optional latest first via the settings. You can change the drive category for a drive by tapping the appropriate radio
button. The radio buttons can be locked after 5 days to prevent the category from accidentally being changed if the screen is touched. There
is also a filter to help you find drives in a date range, category, or with given keywords in the origin, destination or note. Space is
limited so not all search functions are easily represented and the filter and summary may not display at the same time.
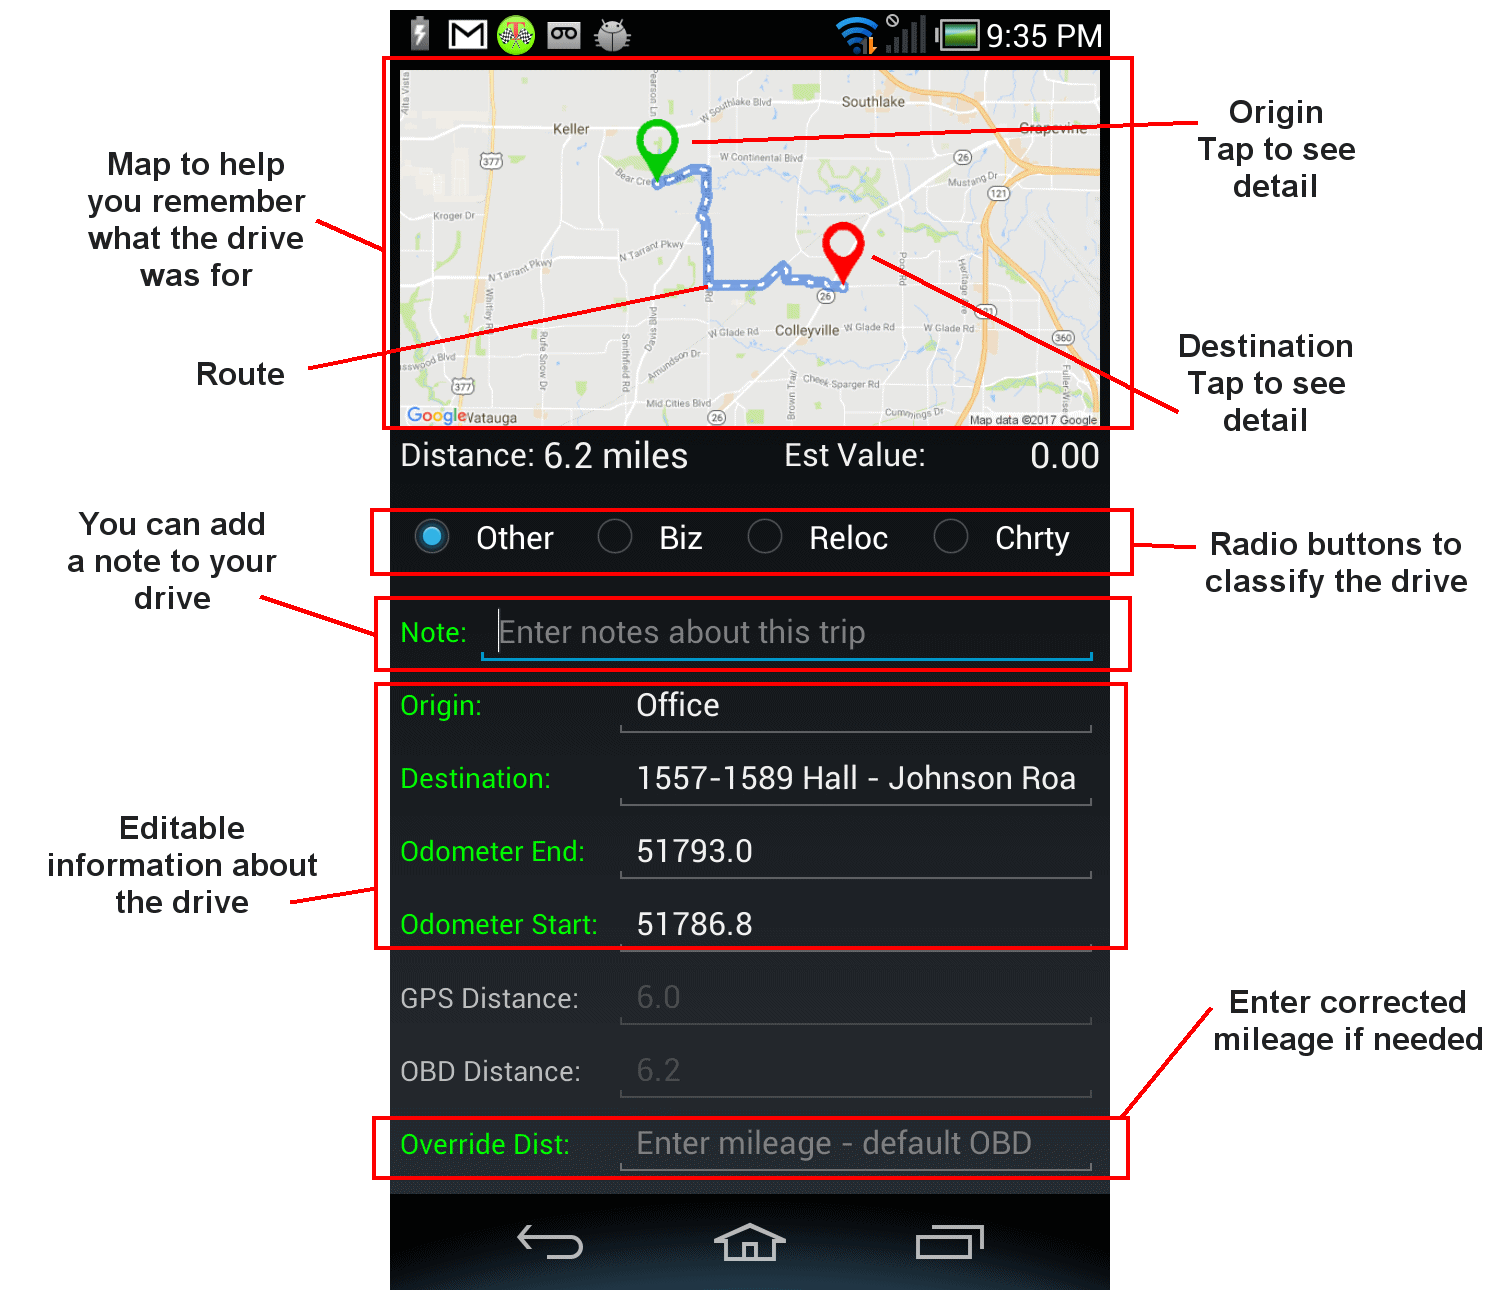
Drive Detail
Once the drive is in the list view you drill down on it an see or change the details of the drive.
You can see a trace of where you traveled. The view will include a static map with Origin/Destination marked.
For more recent drives the application may show the drive route. The
information about the route is temporary, local to the device and is only intended to help you remember the drive so you can classify it.
In order to protect the data collected by a sensor in MilesforTax not all fields are editable on records collected by a sensor such as OBD-II
or the GPS. You can change the distance on those records but the original sensor data is not editable on the normal version of MilesforTax.
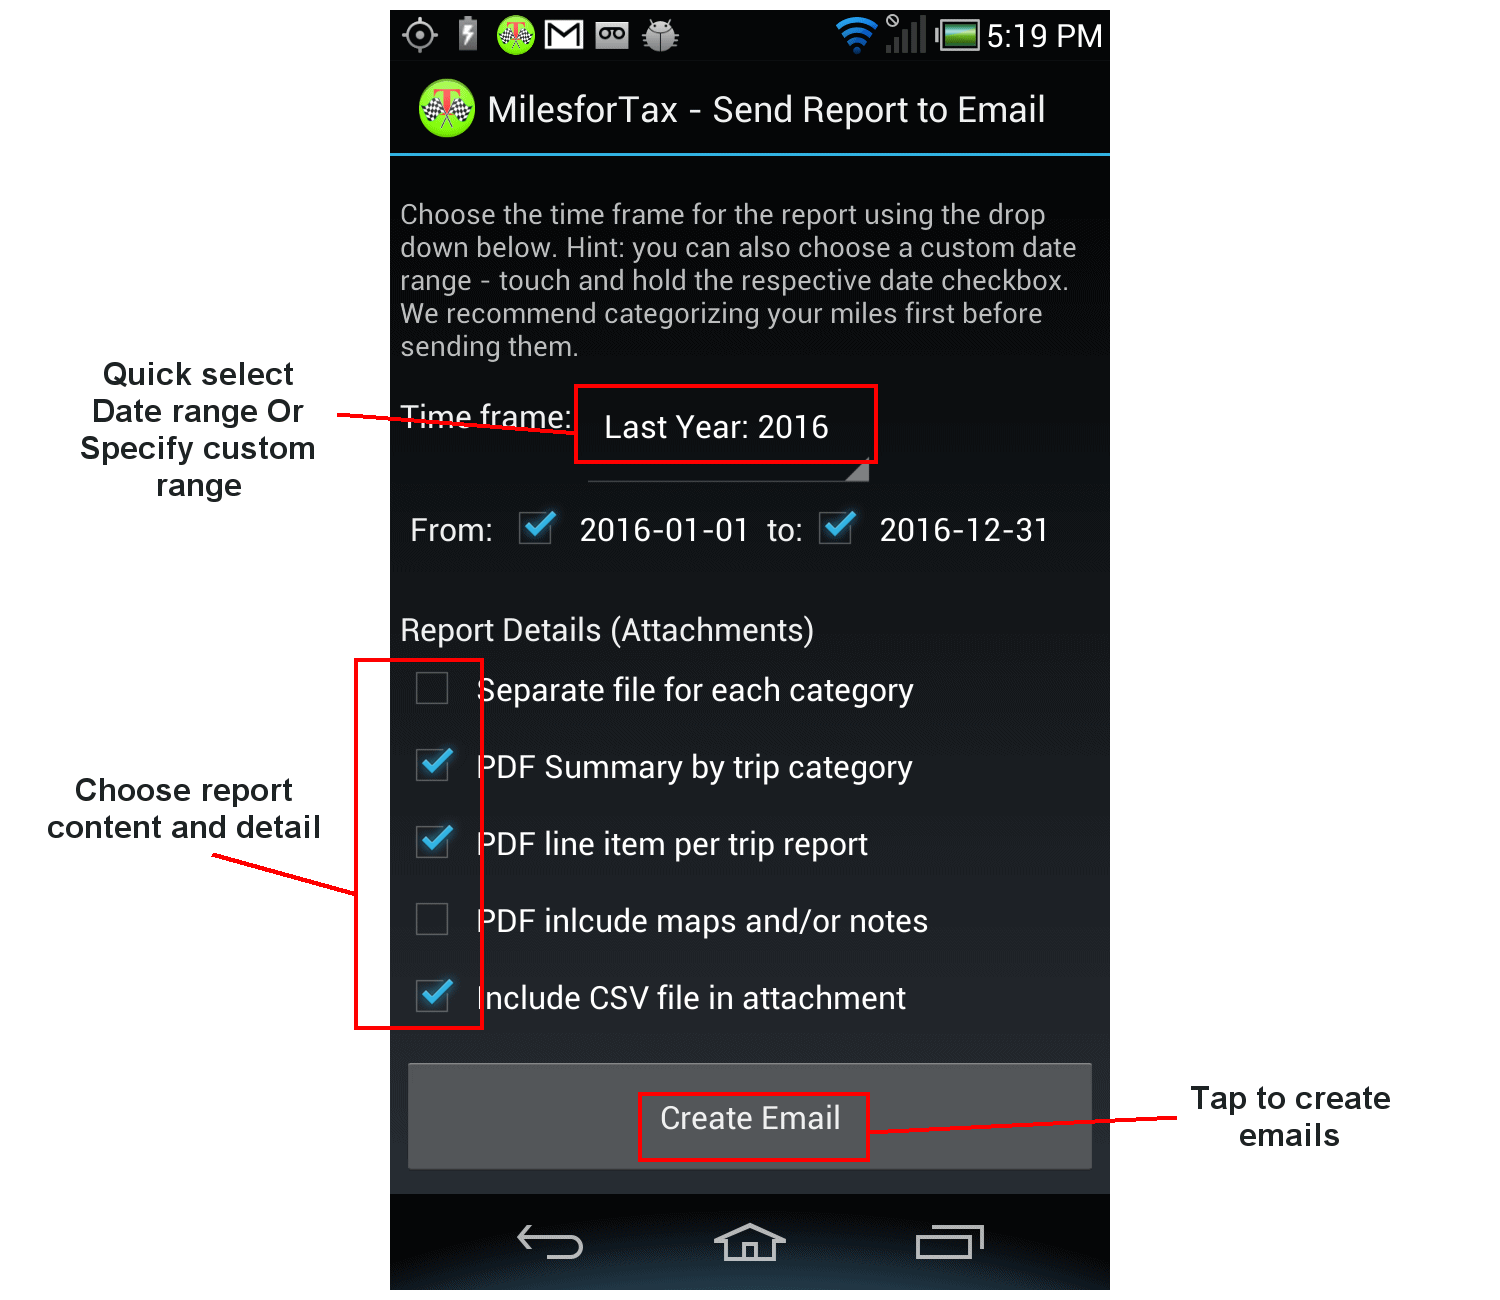
Getting a Report
You can get a report as an attachment in an email, ready to send.
MilesforTax builds a skeleton email and attaches your PDF and CSV files to the email - just add the email
addresses of you recipient and change the wording and its ready to send.
From the main screen tap the "Send report to email" button. Choose your date, chose the level of detail and
content of the report follow the prompts and you get an email created on your device. The email will use
whatever email client you have to send the report to whoever you think needs it. You can use email as a place
to back up your mileage. Reports are PDF files or CSV files. The PDF files are not really editable however you
can use the CSV files and import your mileage into other applications or spread-sheets and use a different
rebate level for your drives. Reports are generated locally on your phone.
The data for the last reports are in a files in directory /sdcard/mileage/ - be careful not to delete this directory
all application data is stored here and you will loose all your drives.
1) mileage-report.csv - csv file containing you mileage for the specific period
2) mileage-report.pdf - pdf file. There may be up to four separate pdf files with similar names and the category name in the filename if you
choose separate files for each drive category.
Tax Time
The nice thing about reporting is that you can get an answer. The thing we could all use more of is personal time and to have reporting
automated or done by someone or something else means in most case more time to focus on more exciting activities. MilesforTax provides a
solution by recording your mileage into a log, in the background. Most of what you have to do is watch the progression of your rebate though
the year and when it is tax time you will have a summary of all your drives. Even if you didn't categorize the drives you will have the data
available. If you get audited you will have the data. May tax attorneys say their clients that are being audited don't even have the data so
the case for making a mileage claim is even more remote. The will be tools available to associate repeated addresses with business of charity
coming soon.